
In this article, we have tried to answer all the key questions. The first step in solving the task is to determine which protection system is being used. To do this, you can refer to the list of popular captchas and anti-bot protection systems, where you will find visual examples and key indicators that help you quickly understand what you are dealing with.
If you discover that your site uses reCAPTCHA v3, the next step is to study its properties and operation in more detail. In this article, you can also review the instructions on how to integrate reCAPTCHA v3 so that you fully understand how it functions on your site. This will help you not only understand the current protection, but also properly plan its maintenance.

How to solve reCAPTCHA v3 via CapMonster Cloud
When testing forms that include reCAPTCHA v3, you often need to verify that the captcha works and is integrated correctly.
You can verify the captcha embedded on your site manually.
- Open the form page and make sure the captcha renders.
- Try submitting the form without solving it — the server should return an error.
- After a successful solution, the form must be submitted without issues.
For automatic solving you can use tools like CapMonster Cloud, which accepts captcha parameters, processes them on its servers, and returns a ready-to-use token. Insert this token into the form to pass the check without user interaction.
Working with CapMonster Cloud via API typically involves the following steps:
 Creating a task
 Sending an API request
Your request to solve reCAPTCHA v3 must include the following parameters:
type - RecaptchaV3TaskProxyless;
websiteURL - the page address where the captcha is solved;
websiteKey - the key identifier (sitekey) specified on the page of your site with the captcha;
minScore - can have a value from 0.1 to 0.9;
pageAction - the value of the action parameter that is passed by the ReCaptcha widget in Google. Default value: verify.

https://api.capmonster.cloud/createTask{
"clientKey": "API_KEY",
"task": {
"type": "RecaptchaV3TaskProxyless",
"websiteURL": "https://lessons.zennolab.com/captchas/recaptcha/v3.php?level=beta",
"websiteKey": "6Le0xVgUAAAAAIt20XEB4rVhYOODgTl00d8juDob",
"minScore": 0.7,
"pageAction": "myverify"
}
}
{
  "errorId":0,
  "taskId":407533072
}
 Receiving the result
https://api.capmonster.cloud/getTaskResult{
"clientKey":"API_KEY",
"taskId": 407533072
}
{
  "errorId": 0,
  "status": "ready",
  "solution": {
    "gRecaptchaResponse": "3AHJ_VuvYIBNBW5yyv0zRYJ75VkOKv…hKj9_xGBJKnQimF72rfoq3Iy-DyGHMwLAo6a3"
  }
}
 Placing the token on the page
const { chromium } = require('playwright');
const {
CapMonsterCloudClientFactory,
ClientOptions,
RecaptchaV3ProxylessRequest
} = require('@zennolab_com/capmonstercloud-client');
(async () => {
const TARGET_URL = 'https://lessons.zennolab.com/captchas/recaptcha/v3.php?level=beta'; // URL of your page with the captcha
const SITE_KEY = '6Le0xVgUAAAAAIt20XEB4rVhYOODgTl00d8juDob';
const API_KEY = 'your_capmonster_cloud_api_key'; // Specify your CapMonster Cloud API key
// Create a CapMonster client
const cmcClient = CapMonsterCloudClientFactory.Create(new ClientOptions({ clientKey: API_KEY }));
// Open the browser
const browser = await chromium.launch({ headless: false });
const page = await browser.newPage();
await page.goto(TARGET_URL, { waitUntil: 'domcontentloaded' });
// Configure the reCAPTCHA v3 task
const recaptchaRequest = new RecaptchaV3ProxylessRequest({
websiteURL: TARGET_URL,
websiteKey: SITE_KEY,
minScore: 0.6,
pageAction: 'myverify', // match the action on the page
});
// Solve the captcha
const solution = await cmcClient.Solve(recaptchaRequest);
const token = solution.solution?.gRecaptchaResponse;
if (!token) {
console.error('Token is empty, check the sitekey and URL');
await browser.close();
return;
}
console.log('Token received:', token);
// Insert the token into a hidden field and emulate a click on the button
// Replace with the required selectors
await page.evaluate((t) => {
const input = document.querySelector('#v3_token');
if (input) input.value = t;
const form = document.querySelector('#v3_form');
if (form) form.submit();
}, token);
console.log('Token inserted and form submitted');
await page.waitForTimeout(5000);
await browser.close();
})();1. Go to the reCAPTCHA admin console page.
2. Register a new site and choose the captcha type — reCAPTCHA v3
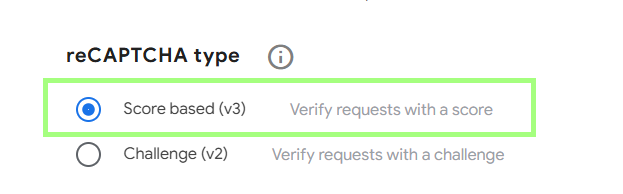
3. Get the two keys:
- Site key — public key (used on the frontend);
- Secret key — private key (used on the server for verification)
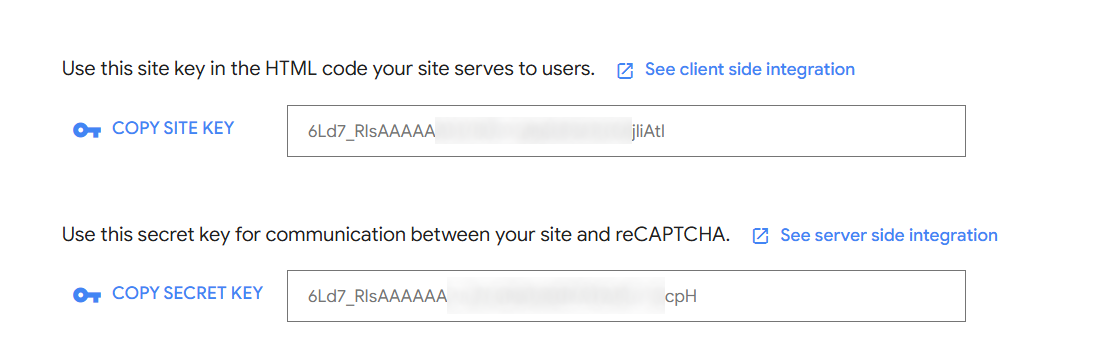
You can open the settings where you can, for example, specify domains that are allowed to use reCAPTCHA or configure alerts for site issues or spikes in suspicious traffic.
4. Client-side code examples
The simplest way to use reCAPTCHA v3 is to include the JavaScript API and add attributes to a button.
Connecting the API:
<script src="https://www.google.com/recaptcha/api.js"></script>Callback function for the form:
<script>
  function onSubmit(token) {
    document.getElementById("form").submit();
  }
</script>
Button with reCAPTCHA attributes:
<button class="g-recaptcha"
        data-sitekey="reCAPTCHA_sitekey"
        data-callback='onSubmit'
        data-action='submit'>Submit</button>
For full control, use grecaptcha.execute with the render parameter:
Connecting the API with the key:
<script src="https://www.google.com/recaptcha/api.js?render=reCAPTCHA_site_key"></script>Programmatic call:
<script>
  function onClick(e) {
    e.preventDefault();
    grecaptcha.ready(function() {
      grecaptcha.execute('reCAPTCHA_sitekey', {action: 'submit'}).then(function(token) {
          // Send the token to the server for verification
      });
    });
  }
</script>
The token should be sent to the server for verification immediately.
Important notes:
- Token lifetime: the token received from reCAPTCHA v3 is valid for 2 minutes. Make sure you send it to the server within this time.
- Server-side verification: after receiving the token on the server, send a POST request to https://www.google.com/recaptcha/api/siteverify with the following parameters:
– secret: your secret key
– response: the token received from the client– remoteip (optional): the user’s IP address - Google’s server will return a JSON response containing details about the verification result.
5. Now verify the response on the server side
 PHP example
<?php
// Your reCAPTCHA v3 secret key
$secret = 'YOUR_SECRET_KEY';
// Get the token from the form
$token = $_POST['recaptcha-token'] ?? '';
// Send a request to Google to verify the token
$response = file_get_contents(
"https://www.google.com/recaptcha/api/siteverify?secret={$secret}&response={$token}"
);
$result = json_decode($response, true);
// Check success and the trust score
if ($result['success'] && $result['score'] >= 0.5 && $result['action'] === 'submit') {
echo "Verification passed";
} else {
http_response_code(403);
echo "Verification failed";
}
?>
Notes:
- Make sure that on the client the token is sent in a hidden form field named recaptcha-token:
- The score threshold can be adjusted depending on how strict you want to be (for example, 0.3–0.7).
- Checking action === 'submit' increases security by making sure the token is issued for the specific action on the page.
<input type="hidden" name="recaptcha-token" id="recaptcha-token">






Supported captchas
 reCAPTCHA v2reCAPTCHA v3reCAPTCHA v2 EnterprisereCAPTCHA v3 Enterprise
 GeeTest
 Cloudflare TurnstileCloudflare Bot Challenge
 DataDome
 Tencent CAPTCHA
 Amazon Waf
 Faucet Pay
 Imperva (Incapsula)
 Prosopo
 Text CAPTCHA
 BinanceComplexImageTask Recaptcha
 ComplexImageTask RecognitionreCAPTCHA Enterprise (Spotify, Yahoo)
 Yidun
Yidun MTCaptcha
 Altcha
 Funcaptcha
 TSPD
TSPD Hunt
Hunt Alibaba
 Friendly
If you’ve taken over a website that already has a captcha or another protection system installed, but you don’t have access to the code, don’t worry! It’s quite easy to identify which technology is being used. To verify that everything works correctly, you can use the CapMonster Cloud recognition service in an isolated test environment to make sure that the token processing mechanism and the validation logic are functioning properly.
In the case of reCAPTCHA v3, it’s enough to detect the system, observe its behavior, and confirm that the protection is working correctly. In this article, we showed how to identify reCAPTCHA v3 and where to find instructions on how to integrate or reconfigure it, so you can confidently maintain the protection and keep its operation under control.
 reCAPTCHA v3 documentation →CapMonster Cloud documentation (working with reCAPTCHA v3) →How to solve ReCaptcha v3 in Python using Selenium & CapMonster Cloud →How to solve ReCaptcha v3 in JavaScript using Selenium & CapMonster Cloud →How to solve ReCaptcha v3 in C# using Selenium & CapMonster Cloud →
Frequently Asked Questions about reCAPTCHA v3
