
In this article, we have tried to answer all the key questions. The first step in solving the task is to determine which protection system is being used. To do this, you can refer to the list of popular captchas and anti-bot protection systems, where you will find visual examples and key indicators that help you quickly understand what you are dealing with.
If you discover that your site uses FunCaptcha (Arkose Labs CAPTCHA), the next step is to study its properties and operation in more detail. In this article, you can also review the instructions on how to integrate FunCaptcha (Arkose Labs CAPTCHA) so that you fully understand how it functions on your site. This will help you not only understand the current protection, but also properly plan its maintenance.

How to solve FunCaptcha using CapMonster Cloud
- Open the page with the form and make sure the captcha is displayed.
- Try submitting the form without solving the captcha — the server should return an error.
- After successfully solving the captcha, the form should be submitted without errors.
Working with CapMonster Cloud via API typically involves the following steps:
 Creating a task
 Sending an API request
type - FunCaptchaTask
websiteURL - the URL of the page where the captcha is being solved;
websitePublicKey - the FunCaptcha key (the public key or pk value);
data - an additional parameter, required if data[blob] is used on the website;
funcaptchaApiJSSubdomain - the Arkose Labs subdomain (the surl value). Specify it only if it differs from the default: client-api.arkoselabs.com
userAgent - Browser User-Agent. Pass only a current UA from a Windows operating system.
This task also requires using your own proxies:
proxyType :
- http — standard HTTP/HTTPS proxy;
- https — try this option if “http” does not work (required for some custom proxies);
- socks4 — SOCKS4 proxy;
- socks5 — SOCKS5 proxy.
proxyAddress - Proxy IP address (IPv4/IPv6).
proxyPort - Proxy port.
proxyLogin - Proxy server login.
proxyPassword - Proxy server password.

https://api.capmonster.cloud/createTask
{
  "clientKey": "API_KEY",
  "task": {
    "type": "FunCaptchaTask",
    "websiteURL": "https://www.example.com",
    "websitePublicKey": "EX72CCFB-26EX-40E5-91E6-85EX70BE98ED",
    "funcaptchaApiJSSubdomain": "example-api.arkoselabs.com",
    "data": "{\"blob\":\"nj9UbL+yio7goOlTQ/b64t.ayrrBnP6kPgzlKYCP/kv491lKS...Wot/7gjpyIxs7VYb0+QuRcfQ/t6bzh5pXDkOFSskA/V/ITSVZSAlglIplLcdreZ4PE8skfMU6k1Q\"}",
    "userAgent": "Mozilla/5.0 (Windows NT 10.0; Win64; x64) AppleWebKit/537.36 (KHTML, like Gecko) Chrome/151.0.0.0 Safari/537.36",
    "proxyType": "http",  // Add a proxy if required
    "proxyAddress": "8.8.8.8",
    "proxyPort": 8080,
    "proxyLogin": "proxyLoginHere",
    "proxyPassword": "proxyPasswordHere"
  }
}
{
"errorId":0,
"taskId":407533072
} Receiving the result
https://api.capmonster.cloud/getTaskResult{
"clientKey":"API_KEY",
"taskId": 407533072
}
{
  "errorId": 0,
  "errorCode": null,
  "errorDescription": null,
  "solution": {
    "token": "337187b9f57678923.5060184402|r=us-west-2|lang=en|pk=EX72CCFB-26EX-40E5-91E6-85EX70BE98ED|at=40|ag=101|cdn_url=https%3A%2F%2Fclient-api.arkoselabs.com%2Fcdn%2Ffc|surl=https%3A%2F%2Fclient-api.arkoselabs.com|smurl=https%3A%2F%2Fclient-api.arkoselabs.com%2Fcdn%2Ffc%2Fassets%2Fstyle-manager",
    "userAgent": "Mozilla/5.0 (Windows NT 10.0; Win64; x64) AppleWebKit/537.36 (KHTML, like Gecko) Chrome/143.0.0.0 Safari/537.36"
  },
  "status": "ready"
}
 Placing the token on the page
// npm install playwright
const { chromium } = require("playwright");

const WEBSITE_URL = "https://example.com";
// token received from CapMonster Cloud
const FUN_CAPTCHA_TOKEN = "PUT_YOUR_FUN_CAPTCHA_TOKEN_HERE";

(async () => {
  const browser = await chromium.launch({ headless: false });
  const context = await browser.newContext();
  const page = await context.newPage();

  /**
   * Universal Arkose interceptor (v1 / v2)
   * Executed before page load
   */
  await page.addInitScript(() => {
    const callbacks = [];

    function captureCallback(cb, source) {
      if (typeof cb === "function") {
        callbacks.push(cb);
        console.log("[Arkose] callback captured from", source);
      }
    }

    function patchRender(obj, name) {
      if (!obj || typeof obj.render !== "function") return;

      const originalRender = obj.render;
      obj.render = function (container, options = {}) {
        captureCallback(options.callback, name + ".render");
        return originalRender.apply(this, arguments);
      };
    }

    // Interception via Object.defineProperty (often used by Arkose)
    const originalDefineProperty = Object.defineProperty;
    Object.defineProperty = function (target, prop, descriptor) {
      if (
        (prop === "FunCaptcha" || prop === "ArkoseEnforcement") &&
        descriptor &&
        typeof descriptor.value === "object"
      ) {
        patchRender(descriptor.value, prop);
      }
      return originalDefineProperty.apply(this, arguments);
    };

    // Fallback: periodic check of global objects
    const interval = setInterval(() => {
      if (window.FunCaptcha) patchRender(window.FunCaptcha, "FunCaptcha");
      if (window.ArkoseEnforcement)
        patchRender(window.ArkoseEnforcement, "ArkoseEnforcement");

      if (callbacks.length > 0) clearInterval(interval);
    }, 200);

    // Universal entry point for passing the token
    window.__arkoseSolve = function (token) {
      if (callbacks.length > 0) {
        callbacks.forEach((cb) => cb(token));
        console.log("[Arkose] token delivered via captured callbacks");
        return true;
      }

      // Alternative options
      if (typeof window.arkoseCallback === "function") {
        window.arkoseCallback(token);
        console.log("[Arkose] token delivered via arkoseCallback");
        return true;
      }

      // Fallback
      window._arkoseToken = token;
      console.log("[Arkose] token stored in window._arkoseToken");
      return false;
    };
  });

  /**
   * Open the page
   */
  console.log("Opening page...");
  await page.goto(WEBSITE_URL, { waitUntil: "domcontentloaded" });

  /**
   * Here the website should initialize FunCaptcha
   * (registration, login, button, form, etc.)
   */

  /**
   * Pass the ready token
   */
  console.log("Injecting FunCaptcha token...");
  await page.evaluate((token) => {
    if (!window.__arkoseSolve) {
      console.log("[Arkose] solver not ready");
      return;
    }
    window.__arkoseSolve(token);
  }, FUN_CAPTCHA_TOKEN);

  /**
   * Give the page time to process the result
   */
  await page.waitForTimeout(5000);

  console.log("Done.");
  await browser.close();
})();
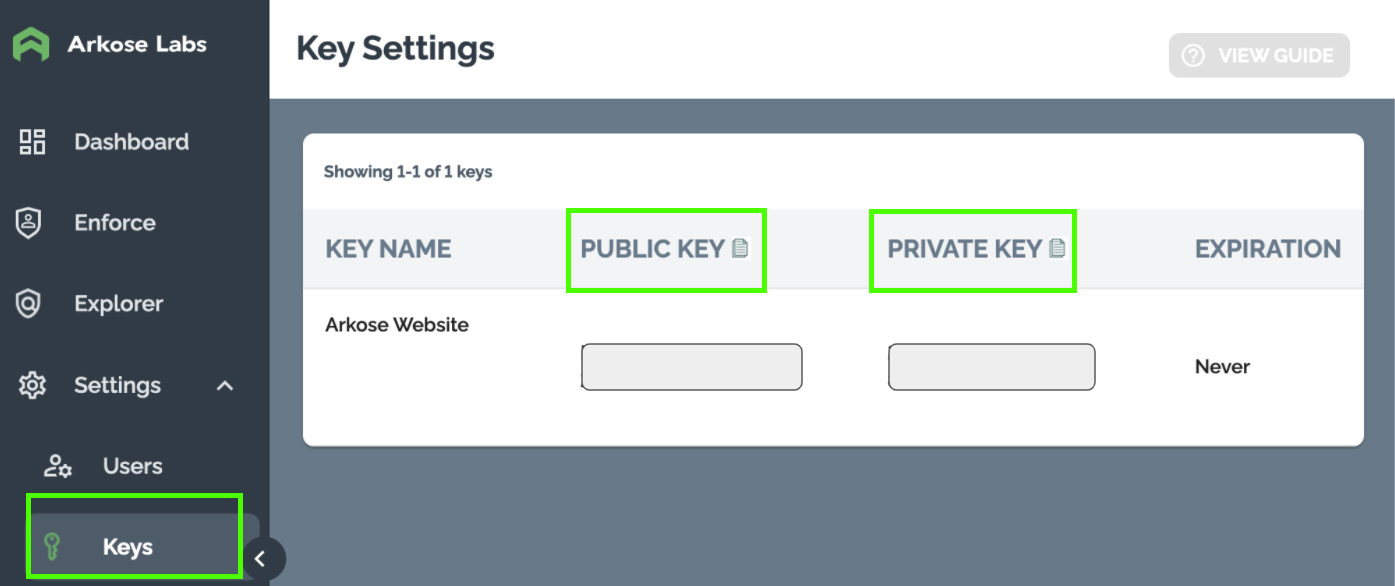
- Register with Arkose Labs and obtain access to the Arkose Command Center (you can contact them via chat and submit your details in the form, for example here or here).
After gaining access, obtain two keys (Public / Private) in the Settings → Keys section.
If necessary, contact your Customer Success Manager (CSM) to:
- obtain custom API domains;
- receive Verify API request and response schemas.
Arkose recommendations
- Use a Development Key for testing.
- Use a separate Production Key for each workflow (login, registration, purchase, etc.).
- Use different keys for different websites.
General workflow
- The client collects data and displays a challenge if necessary.
- The client receives a one-time token.
- The server verifies the token via the Arkose Verify API.
Step 1. Client-side integration
On the browser side (Arkose Bot Manager):
- analyzes user behavior;
- displays an Enforcement Challenge if required;
- returns a one-time session token.
Client API:
- For testing, you can use:
client-api.arkoselabs.com - For production, it is recommended to specify a custom domain:
<company>-api.arkoselabs.com
Key requirements
- The Arkose client script must be loaded only once per page
- A global callback must be defined
- setConfig() must be called
- Based on the result, a decision is made (allow or deny the action).
The result of the client-side process is a token that must be sent to the server.
 Integration example
<html>
<head>
  <!--
    Include the Arkose Labs API in the <head> of the page. In the example below, be sure to:
    - replace <YOUR PUBLIC KEY> with the public key provided by Arkose Labs;
    - replace <YOUR CALLBACK> with the name of the global callback function you define below.
   Example:
    <script src="//client-api.arkoselabs.com/v2/<YOUR PUBLIC KEY>/api.js"
            data-callback="setupDetect"></script>
  -->
  <script src="//client-api.arkoselabs.com/v2/<YOUR PUBLIC KEY>/api.js" data-callback="<YOUR CALLBACK>"></script>
  <link rel="shortcut icon" href="#">
  <meta charset="UTF-8">
</head>

<body>
  <!--
    The trigger element can be located anywhere on the page and can be added to the DOM at any time.
  -->
  <button id="arkose-trigger">
    trigger element
  </button>

  <!--
    To configure Arkose (detection or enforcement mode), place the script before the closing </body> tag and define the callback function as global.
  -->
  <script>
    /*
      This global function will be called when the Arkose API is ready. The function name must match the value of the data-callback attribute of the script tag that loads the Arkose API.
    */
    function setupArkose(myArkose) {
      myArkose.setConfig({
        selector: '#arkose-trigger',
        onCompleted: function(response) {
          // One-time token that must be sent to the server
          console.log(response.token);
        }
      });
    }
  </script>
</body>
</html>
Step 2. Server-side verification
On the server, the token is verified via the Arkose Verify API.
Verify API endpoint
https://<company>-verify.arkoselabs.com/api/v4/verify/Required request parameters
- private_key — Arkose private key
- session_token — token received on the client
Example POST request body
{
  "private_key": "_PRIVATE_KEY_HERE_",
  "session_token": "_SESSION_TOKEN_HERE_",
  "log_data": "_LOG_DATA_HERE_"
}
The API response contains session information and the verification result.
Key points
- Public Key — client-only
- Private Key — server-only
- The token is one-time
- Without server-side verification, the captcha is considered invalid
- Arkose can operate invisibly and show a challenge only when risk is detected
Example of server-side verification in PHP:
<?php
$private_key = 'YOUR_PRIVATE_KEY';
$verify_url = 'https://<company>-verify.arkoselabs.com/api/v4/verify/';

$input = json_decode(file_get_contents('php://input'), true);
$session_token = $input['session_token'] ?? null;
$log_data = $input['log_data'] ?? '';
$email_address = $input['email_address'] ?? '';

if (!$session_token) {
    http_response_code(400);
    echo json_encode(['error' => 'Session token is missing']);
    exit;
}

$data = [
    'private_key' => $private_key,
    'session_token' => $session_token,
    'log_data' => $log_data,
    'email_address' => $email_address
];

$options = [
    'http' => [
        'header'  => "Content-Type: application/json\r\n",
        'method'  => 'POST',
        'content' => json_encode($data),
    ],
];

$context  = stream_context_create($options);
$result = file_get_contents($verify_url, false, $context);

if ($result === FALSE) {
    http_response_code(500);
    echo json_encode(['error' => 'Captcha verification error']);
    exit;
}

echo $result;
?>
How it works:
- The client solves the captcha on the website and receives a session token.
- The client sends the token to your server via a POST request.
- The server calls the Arkose Verify API with the private key and the session token
- Arkose returns a JSON response with session information and verification status.
- The server checks the result (result.success) and decides whether to allow further actions.




Supported captchas
 reCAPTCHA v2reCAPTCHA v3reCAPTCHA v2 EnterprisereCAPTCHA v3 Enterprise
 GeeTest
 Cloudflare TurnstileCloudflare Bot Challenge
 DataDome
 Tencent CAPTCHA
 Amazon Waf
 Faucet Pay
 Imperva (Incapsula)
 Prosopo
 Text CAPTCHA
 BinanceComplexImageTask Recaptcha
 ComplexImageTask RecognitionreCAPTCHA Enterprise (Spotify, Yahoo)
 Yidun
Yidun MTCaptcha
 Altcha
 Funcaptcha
 TSPD
TSPD Hunt
Hunt Alibaba
 Friendly
If you’ve taken over a website that already has a captcha or another protection system installed, but you don’t have access to the code, don’t worry! It’s quite easy to identify which technology is being used. To verify that everything works correctly, you can use the CapMonster Cloud recognition service in an isolated test environment to make sure that the token processing mechanism and the validation logic are functioning properly.
In the case of FunCaptcha, it’s enough to detect the system, observe its behavior, and confirm that the protection is working correctly. In this article, we showed how to identify FunCaptcha and where to find instructions on how to integrate or reconfigure it, so you can confidently maintain the protection and keep its operation under control.


Frequently Asked Questions about FunCaptcha
