
In this article, we have tried to answer all the key questions. The first step in solving the task is to determine which protection system is being used. To do this, you can refer to the list of popular captchas and anti-bot protection systems, where you will find visual examples and key indicators that help you quickly understand what you are dealing with.
If you discover that your site uses Imperva Incapsula, the next step is to study its properties and operation in more detail. In this article, you can also review the instructions on how to integrate Imperva Incapsula so that you fully understand how it functions on your site. This will help you not only understand the current protection, but also properly plan its maintenance.

How to solve Incapsula via CapMonster Cloud
When testing pages protected by Imperva Incapsula, it is often necessary to ensure that the protection is working correctly and that the system properly filters suspicious traffic.
You can manually check the protection on your site:
- Open the desired page and ensure that Incapsula presents a check.
- Try to access without completing the check — the site should return a 405 error or an additional challenge.
- After passing the check, access should open without errors.
To automate such checks, you can use services like CapMonster Cloud.
CapMonster accepts Imperva challenge parameters (e.g., the _incap_ cookie, data from HTML and scripts), processes them, and returns ready-made valid cookies that can be inserted into a browser or HTTP client.
Working with CapMonster Cloud via API typically involves the following steps:
 Creating a task
 Sending an API request
In the request to solve Incapsula, the following parameters must be specified:
type - CustomTask;
class - Imperva;
websiteURL - address of the main page where the Incapsula is located;
incapsulaScriptUrl (inside metadata) - "incapsulaScriptUrl": "_Incapsula_Resource?SWJIYLWA=719d34d31c8e3a6e6fffd425f7e032f3" — name of the Incapsula js file;
incapsulaCookies (inside metadata) - your cookies from Incapsula. Can be obtained on the page using document.cookie or in the Set-Cookie request header: "incap_sess_*=...; visid_incap_*=..." (see /createTask request example);
reese84UrlEndpoint (inside metadata) - name of the endpoint where the reese84 fingerprint is sent;
userAgent - Browser User-Agent. Pass only actual UA from Windows OS;
Also, for this task, using your own proxies is required:
proxyType :
- http - regular HTTP/HTTPS proxy;
- https - try this option if "http" doesn't work (required for some custom proxies);
- socks4 - SOCKS4 type proxy;
- socks5 - SOCKS5 type proxy;
proxyAddress - Proxy IP address IPv4/IPv6;
proxyPort - proxy port;
proxyLogin - proxy server login;
proxyPassword - proxy server password.

https://api.capmonster.cloud/createTask{
"clientKey": "API_KEY",
"task": {
"type": "CustomTask",
"class": "Imperva",
"websiteURL": "https://example.com",
"userAgent": "Mozilla/5.0 (Windows NT 10.0; Win64; x64) AppleWebKit/537.36 (KHTML, like Gecko) Chrome/151.0.0.0 Safari/537.36",
"metadata": {
"incapsulaScriptUrl": "_Incapsula_Resource?SWJIYLWA=719d34d31c8e3a6e6fffd425f7e032f3",
"incapsulaCookies": "incap_ses_1166_2930313=br7iX33ZNCtf3HlpEXcuEDzz72cAAAAA0suDnBGrq/iA0J4oERYzjQ==; visid_incap_2930313=P3hgPVm9S8Oond1L0sXhZqfK72cAAAAAQUIPAAAAAABoMSY9xZ34RvRseJRiY6s+;",
"reese84UrlEndpoint": "Built-with-the-For-hopence-Hurleysurfecting-the-"
},
"proxyType": "http",
"proxyAddress": "8.8.8.8",
"proxyPort": 8080,
"proxyLogin": "proxyLoginHere",
"proxyPassword": "proxyPasswordHere"
}
}{
"errorId":0,
"taskId":407533072
} Receiving the result
https://api.capmonster.cloud/getTaskResult{
"clientKey":"API_KEY",
"taskId": 407533072
}{
"errorId":0,
"status":"ready",
"solution": {
"domains": {
"https://example.com": {
"cookies": {
"___utmvc": "NMB+nRa4inxXNeXuh...MWIwNmU3MQ==; Max-Age=31536000; Domain=.site.com; Path=/; Secure; SameSite=Lax"
}
}
}
}
} Injecting Incapsula cookies into the page
The data received from CapMonster Cloud (valid Incapsula cookies) can be inserted into a browser context or HTTP client. After this, the site recognizes the request as verified and allows the user through without additional challenges.
For automation and testing, it is convenient to use Puppeteer, Selenium, or Playwright — they allow you to:
- load the page protected by Incapsula;
- insert the received cookies into the browser context;
- refresh the page with the valid session;
- perform further actions (submit a form, follow links, etc.).
This way, you can check the correctness of the protection and ensure that the site processes valid Incapsula sessions correctly.
// npm install playwright @zennolab_com/capmonstercloud-client
// npx playwright install chromium

import { chromium } from "playwright";
import { CapMonsterCloudClientFactory, ClientOptions, ImpervaRequest } from '@zennolab_com/capmonstercloud-client';

async function main() {
    // 1) Settings
    const TARGET_URL = "https://example.com";
    const API_KEY = "YOUR_CAPMONSTER_API_KEY";

    const proxy = {
        proxyType: "http",
        proxyAddress: "PROXY_IP",
        proxyPort: 8080,
        proxyLogin: "PROXY_USER",
        proxyPassword: "PROXY_PASS"
    };

    // 2) Open the site and collect Imperva cookies
    const browser = await chromium.launch({
        headless: true,
        proxy: {
            server: `${proxy.proxyType}://${proxy.proxyAddress}:${proxy.proxyPort}`,
            username: proxy.proxyLogin,
            password: proxy.proxyPassword
        }
    });

    const page = await browser.newPage();
    await page.goto(TARGET_URL, { waitUntil: "networkidle" });

    const cookies = await page.context().cookies();
    const impervaCookiesString = cookies
        .filter(c => c.name.startsWith("visid_incap_") || c.name.startsWith("incap_ses_"))
        .map(c => `${c.name}=${c.value}`)
        .join("; ");

    console.log("Imperva cookies from the current page:", impervaCookiesString);

    await browser.close();

    // 3) Solve the Imperva challenge
    const cmcClient = CapMonsterCloudClientFactory.Create(
        new ClientOptions({ clientKey: API_KEY })
    );

    const impervaRequest = new ImpervaRequest({
        websiteURL: TARGET_URL,
        userAgent: "USER_AGENT_STRING",
        metadata: {
            incapsulaScriptUrl: "_Incapsula_Resource?example_param",
            incapsulaCookies: impervaCookiesString
        },
        proxy
    });

    const result = await cmcClient.Solve(impervaRequest);
    console.log("Solution:", result);

    // 4) Substitute the received cookies
    const domain = new URL(TARGET_URL).hostname;
    const solutionCookiesObj = result.solution.domains[domain].cookies;

    const solutionCookies = Object.entries(solutionCookiesObj).map(([name, value]) => ({
        name,
        value,
        domain: ".your-domain",
        path: "/",
        secure: true,
        httpOnly: false
    }));

    // 5) Setting cookies and opening the page
    const browser2 = await chromium.launch({
        headless: false,
        proxy: {
            server: `${proxy.proxyType}://${proxy.proxyAddress}:${proxy.proxyPort}`,
            username: proxy.proxyLogin,
            password: proxy.proxyPassword
        }
    });

    const context2 = await browser2.newContext();
    await context2.addCookies(solutionCookies);

    const page2 = await context2.newPage();
    const resp2 = await page2.goto(TARGET_URL, { waitUntil: "networkidle" });

    // Outputting the final page status (optional)
    // console.log("Final page status after setting cookies:", resp2?.status());

    // …or final screenshot
    // await page2.screenshot({ path: "final_page.png" });

    console.log("Page loaded with applied Imperva cookies.");
}

main().catch(console.error);
1. Create an account (use your work email for registration) and go to the Imperva Cloud Security Console.
2. Confirm your email. After logging in, you will be taken to the control panel (you can learn more about working with the Security Console in the documentation).
3. Open the Websites section and enter the real domain of your site.
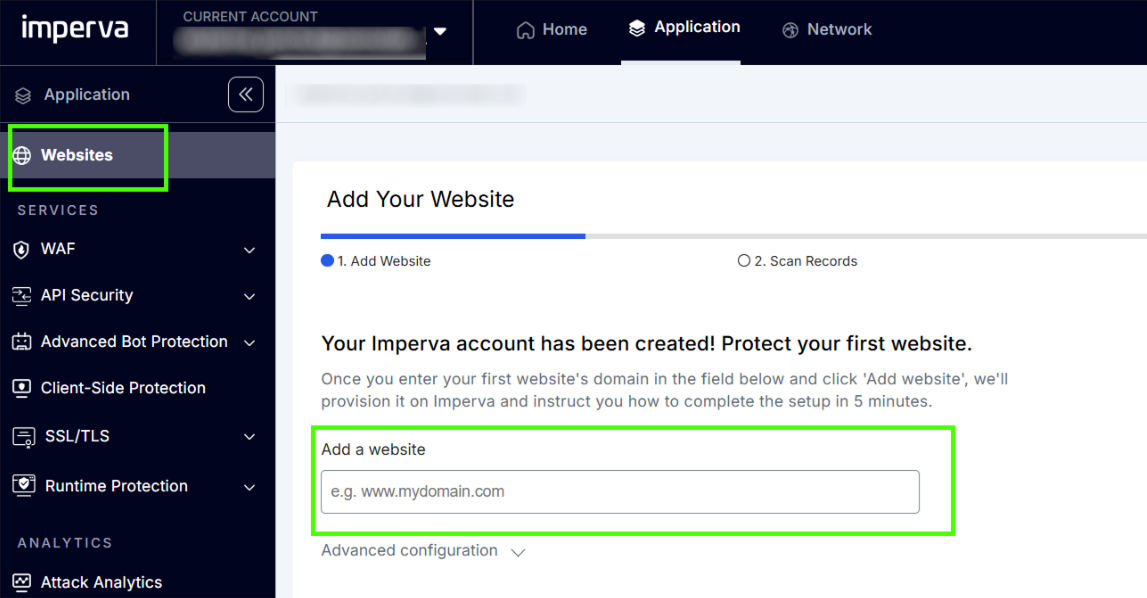
Imperva will automatically:
- detect your DNS provider,
- check SSL,
- start scanning DNS records.
4. Configure DNS records. If Imperva shows the step:
Point dev.mysite.com DNS records to ImpervaDo the following:
- Go to the DNS panel of your registrar or hosting.
- Create or update the record:
Type: CNAME
Name: dev (subdomain you are connecting)
Value: <your_imperva_host>.ng.impervadns.net
Example:
dev.mysite.com > CNAME > xivaxeo.ng.impervadns.netOptional: enable support for Non-SNI clients
If Imperva shows the notification:
If you expect Non-SNI traffic…
This applies to legacy clients and specific integrations. If your site is standard, this step can be skipped.
If needed, enable:
CDN > Delivery > Support Non-SNI clients
5. Wait for DNS verification. Imperva will activate protection and SSL.
When DNS connects, Imperva will automatically:
- deploy CDN,
- activate WAF (Web Application Firewall),
- create an HTTPS certificate,
- enable protection against DDoS and bots.
6. Restrict direct access to your server (recommended)
To ensure traffic goes only through Imperva, on your server you should:
- allow access only from Imperva IP addresses,
- block direct connections (except for your own IPs),
You can learn more in the Create Rules section.
7. Check site operation. After activation
- open your subdomain/domain in a browser,
- or use curl:
curl -I https://dev.mysite.comThe headers should contain lines like:
HTTP/1.1 403 Forbidden
Content-Type: text/html
Cache-Control: no-cache, no-store
Connection: close
Content-Length: 1234
X-Iinfo: 00-00000000-0 0NNN RT(1234567890 0) q(0 -1 -1 1) r(0 -1) B16(0,0,0) U24
Strict-Transport-Security: max-age=31536000
Set-Cookie: visid_incap_00000000000000000000000000000000=ABCDEFG1234567890TESTCOOKIE; expires=Wed, 11 Nov 2026 23:41:40 GMT; HttpOnly; path=/; Domain=.example.com; Secure; SameSite=None
Set-Cookie: incap_ses_0000_00000000=TESTSESSION1234567890; path=/; Domain=.example.com; Secure; SameSite=None
This means that traffic is passing through Imperva.






Supported captchas
 reCAPTCHA v2reCAPTCHA v3reCAPTCHA v2 EnterprisereCAPTCHA v3 Enterprise
 GeeTest
 Cloudflare TurnstileCloudflare Bot Challenge
 DataDome
 Tencent CAPTCHA
 Amazon Waf
 Faucet Pay
 Imperva (Incapsula)
 Prosopo
 Text CAPTCHA
 BinanceComplexImageTask Recaptcha
 ComplexImageTask RecognitionreCAPTCHA Enterprise (Spotify, Yahoo)
 Yidun
Yidun MTCaptcha
 Altcha
 Funcaptcha
 TSPD
TSPD Hunt
Hunt Alibaba
 Friendly
If you’ve taken over a website that already has a captcha or another protection system installed, but you don’t have access to the code, don’t worry! It’s quite easy to identify which technology is being used. To verify that everything works correctly, you can use the CapMonster Cloud recognition service in an isolated test environment to make sure that the token processing mechanism and the validation logic are functioning properly.
In the case of Imperva Incapsula, it’s enough to detect the system, observe its behavior, and confirm that the protection is working correctly. In this article, we showed how to identify Imperva Incapsula and where to find instructions on how to integrate or reconfigure it, so you can confidently maintain the protection and keep its operation under control.



Frequently Asked Questions about Imperva Incapsula
