In this article, we have tried to answer all the key questions. The first step in solving the task is to determine which protection system is being used. To do this, you can refer to the list of popular captchas and anti-bot protection systems, where you will find visual examples and key indicators that help you quickly understand what you are dealing with.
If you discover that your site uses Cloudflare Turnstile, the next step is to study its properties and operation in more detail. In this article, you can also review the instructions on how to integrate Cloudflare Turnstile so that you fully understand how it functions on your site. This will help you not only understand the current protection, but also properly plan its maintenance.

When testing forms that include Cloudflare Turnstile, you often need to verify that the captcha works and is integrated correctly.
You can verify the captcha embedded on your site manually.
For automatic solving you can use tools like CapMonster Cloud, which accepts captcha parameters, processes them on its servers, and returns a ready-to-use token. Insert this token into the form to pass the check without user interaction.
Working with CapMonster Cloud via API typically involves the following steps:
The request to solve Cloudflare Turnstile must specify the following parameters:
type - TurnstileTask;
websiteURL - address of the page where the CAPTCHA is being solved;
websiteKey - Turnstile key.
https://api.capmonster.cloud/createTask{
"clientKey": "API_KEY",
"task": {
"type": "TurnstileTask",
"websiteURL": "http://tsmanaged.zlsupport.com",
"websiteKey": "0x4AAAAAAABUYP0XeMJF0xoy"
}
}{
"errorId":0,
"taskId":407533072
}https://api.capmonster.cloud/getTaskResult{
"clientKey":"API_KEY",
"taskId": 407533072
}{
"errorId": 0,
"status": "ready",
"solution": {
"userAgent": "Mozilla/5.0 (Windows NT 10.0; Win64; x64) AppleWebKit/537.36 (KHTML, like Gecko) Chrome/146.0.0.0 Safari/537.36",
"token": "0.iGX3xsyFCkbGePM3jP4P4khLo6TrLukt8ZzBvwuQOvbC...f61f3082"
}
}// npm install playwright @zennolab_com/capmonstercloud-client
import { chromium } from "playwright";
import { CapMonsterCloudClientFactory, ClientOptions, TurnstileRequest } from "@zennolab_com/capmonstercloud-client";
async function main() {
// 1. Solving Turnstile via CapMonster Cloud
const cmcClient = CapMonsterCloudClientFactory.Create(
new ClientOptions({ clientKey: 'YOUR_CAPMONSTER_API_KEY' })
);
const turnstileRequest = new TurnstileRequest({
websiteURL: 'http://tsmanaged.zlsupport.com',
websiteKey: '0x4AAAAAAABUYP0XeMJF0xoy',
});
const result = await cmcClient.Solve(turnstileRequest);
const token = result.solution.token;
console.log('Turnstile token received:', token);
// 2. Starting Playwright
const browser = await chromium.launch({ headless: false });
const context = await browser.newContext();
const page = await context.newPage();
await page.goto('http://tsmanaged.zlsupport.com');
// 3. Filling in login and password
await page.fill('#username', 'your_username');
await page.fill('#password', 'your_password');
// 4. Waiting for the hidden token field to appear
await page.waitForSelector('#token', { state: 'attached', timeout: 60000 });
// 5. Inserting token and making field visible
await page.evaluate((t) => {
const tokenInput = document.querySelector('#token');
if (tokenInput) {
tokenInput.type = 'text'; // make field visible
tokenInput.value = t; // insert token
console.log('Token inserted into token field');
} else {
console.error('Field #token not found');
}
}, token);
// 6. Verifying that the token was actually inserted
const checkValue = await page.$eval('#token', el => el.value);
console.log('Checking the token value:', checkValue);
// 7. Submitting form
await page.click('button[type="submit"]');
console.log('Form submitted with Turnstile token');
// await browser.close();
}
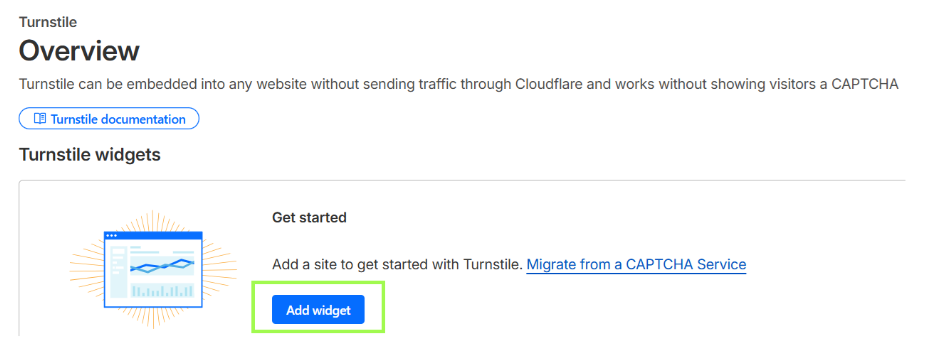
main().catch(err => console.error(err));1. Go to the Cloudflare Turnstile page, click Get Started.
2. Register with the service.
3. In Turnstile Widgets, click the blue Add Widget button.
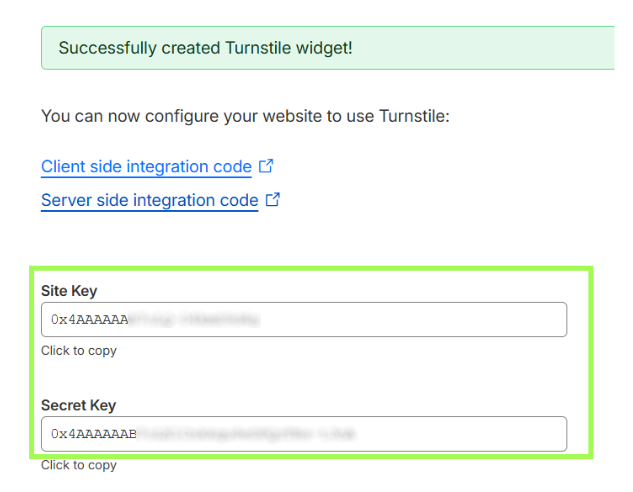
4. Configure Cloudflare Turnstile, specify:
5. After creating the widget, you'll receive two keys—Site Key and Secret Key.
6. Connect the client-side part
1) Connect the Turnstile script
Automatic rendering (widget is created automatically when the page loads):
<script src="https://challenges.cloudflare.com/turnstile/v0/api.js" async defer></script>Programmatic control (you create the widget yourself via JavaScript):
<script src="https://challenges.cloudflare.com/turnstile/v0/api.js?render=explicit" defer></script>Important: the script must be loaded from the exact URL. Proxy or cache may cause failures.
2) Create a container for the widget
Auto:
<div class="cf-turnstile" data-sitekey="<YOUR_SITEKEY>"></div>Programmatically:
<div id="turnstile-container"></div>3) Widget configuration
Via data attributes:
<div class="cf-turnstile"
            data-sitekey="<YOUR_SITEKEY>"
            data-theme="light"
            data-size="normal"
            data-callback="onSuccess">
          </div>
Via JavaScript:
const widgetId = turnstile.render("#turnstile-container", {
  sitekey: "<YOUR_SITEKEY>",
  theme: "light",
  size: "normal",
  callback: token => console.log("Token:", token)
});
4) Working with tokens
const token = turnstile.getResponse(widgetId);      // get token
const isExpired = turnstile.isExpired(widgetId);    // check expiration
turnstile.reset(widgetId);                          // reset
turnstile.remove(widgetId);                         // remove
turnstile.execute("#turnstile-container");         // manual execution
5) Integration with form
<form id="my-form" method="POST">
  <input type="hidden" name="cf-turnstile-response" id="cf-turnstile-response">
  <button type="submit">Submit</button>
</form>

<script>
function onSuccess(token) {
  document.getElementById("cf-turnstile-response").value = token;
}
</script>
<title>Turnstile Example</title>
  <!-- Connect Turnstile script -->
  <script src="https://challenges.cloudflare.com/turnstile/v0/api.js" async defer></script>
</head>
<body>
  <h1>Form example with Turnstile</h1>

  <form id="my-form">
    <label for="username">Name:</label>
    <input type="text" name="username" id="username" required>

    <!-- Container for Turnstile -->
    <div class="cf-turnstile" data-sitekey="<YOUR_SITEKEY>" data-callback="onTurnstileSuccess"></div>

    <button type="submit">Submit</button>
  </form>

  <script>
    // Callback that is called after passing the CAPTCHA
    function onTurnstileSuccess(token) {
      console.log("Received Turnstile token:", token);
      // Save token to hidden form field (optional)
      document.getElementById("cf-turnstile-token")?.remove();
      const input = document.createElement("input");
      input.type = "hidden";
      input.name = "cf-turnstile-response";
      input.id = "cf-turnstile-token";
      input.value = token;
      document.getElementById("my-form").appendChild(input);
    }

    // Form submission
    document.getElementById("my-form").addEventListener("submit", async (e) => {
      e.preventDefault();

      const formData = new FormData(e.target);
      const response = await fetch("/submit-form", {
        method: "POST",
        body: formData
      });

      const result = await response.json();
      if(result.success){
        alert("Form successfully submitted and token verified!");
      } else {
        alert("Turnstile token verification error. Please try again.");
        // Reset widget so the user can complete the CAPTCHA again
        turnstile.reset();
      }
    });
  </script>
</body>
</html>
6) Configure the server-side part
Server-side verification process:
Siteverify API:
https://challenges.cloudflare.com/turnstile/v0/siteverifyRequest parameters:
Token properties:
<?php
function validateTurnstile($token, $secret, $remoteip = null) {
    $url = 'https://challenges.cloudflare.com/turnstile/v0/siteverify';
    $data = ['secret' => $secret, 'response' => $token];
    if ($remoteip) $data['remoteip'] = $remoteip;

    $options = [
        'http' => [
            'header'  => "Content-type: application/x-www-form-urlencoded
",
            'method'  => 'POST',
            'content' => http_build_query($data)
        ]
    ];

    $response = file_get_contents($url, false, stream_context_create($options));
    if ($response === FALSE) {
        return ['success' => false, 'error-codes' => ['internal-error']];
    }

    return json_decode($response, true);
}

// Usage
$secret_key = 'YOUR_SECRET_KEY';
$token = $_POST['cf-turnstile-response'] ?? '';
$remoteip = $_SERVER['REMOTE_ADDR'];

$result = validateTurnstile($token, $secret_key, $remoteip);

if($result['success']){
    echo "Form successfully submitted!";
} else {
    echo "Verification error: " . implode(', ', $result['error-codes']);
}
?>


If you’ve taken over a website that already has a captcha or another protection system installed, but you don’t have access to the code, don’t worry! It’s quite easy to identify which technology is being used. To verify that everything works correctly, you can use the CapMonster Cloud recognition service in an isolated test environment to make sure that the token processing mechanism and the validation logic are functioning properly.
In the case of Cloudflare Turnstile, it’s enough to detect the system, observe its behavior, and confirm that the protection is working correctly. In this article, we showed how to identify Cloudflare Turnstile and where to find instructions on how to integrate or reconfigure it, so you can confidently maintain the protection and keep its operation under control.
