
Web Scraping with Python and Selenium: Basics and Automation
Today, the importance of information has reached its peak, and the ability to extract and analyze data from online resources has become highly valuable and in demand. In this article, we will explore the basics of web scraping using Python and Selenium, as well as discuss how CapMonster Cloud technology helps overcome challenges related to various types of captchas. You will learn how these tools can significantly improve your ability to collect and process data from the internet, opening new opportunities for research, data analysis, and process automation.
What Is Web Scraping? Workflow Stages
Web scraping is the process of extracting data from web pages. This process usually involves using software or scripts to retrieve information presented on websites, which can then be used in various industries and for different purposes. For example, comparing competitors’ prices and services, analyzing consumer preferences, monitoring news and events, and much more.
The web scraping workflow includes the following stages:
Defining objectives: at the first stage, it is necessary to determine what information needs to be extracted and from which web resources.
Analyzing the structure of the target web page: studying the HTML code of the pages to understand where and how the required information is stored. This includes identifying elements such as tags, IDs, classes, and more.
Developing a data extraction script: writing code (for example, in Python using the Selenium browser automation library) that visits web pages, extracts the required data, and stores it in a structured format.
Data processing: the extracted data often requires transformation before further use. This may include removing duplicates, correcting formats, filtering unnecessary data, and more.
Data storage: saving the extracted and processed data in a convenient format, such as CSV, JSON, databases, and others.
It is also important to monitor changes on the target website in order to update the script in a timely manner whenever necessary.
Working with Python and Selenium
Why Are Python and Selenium Convenient for Web Scraping?
The Python programming language and the Selenium library are often used for web scraping for the following reasons:
Ease of use: Python is easy to use and provides many libraries for web scraping.
User action emulation and access to dynamic content: Selenium allows you to automate user actions in a web browser, including scrolling pages and clicking buttons required to load data.
Bypassing anti-crawling mechanisms: some websites use special protection mechanisms, and simulating real user actions helps bypass these restrictions.
Wide support: a large community and numerous resources make working with these tools much easier.
Installing and Importing Tools
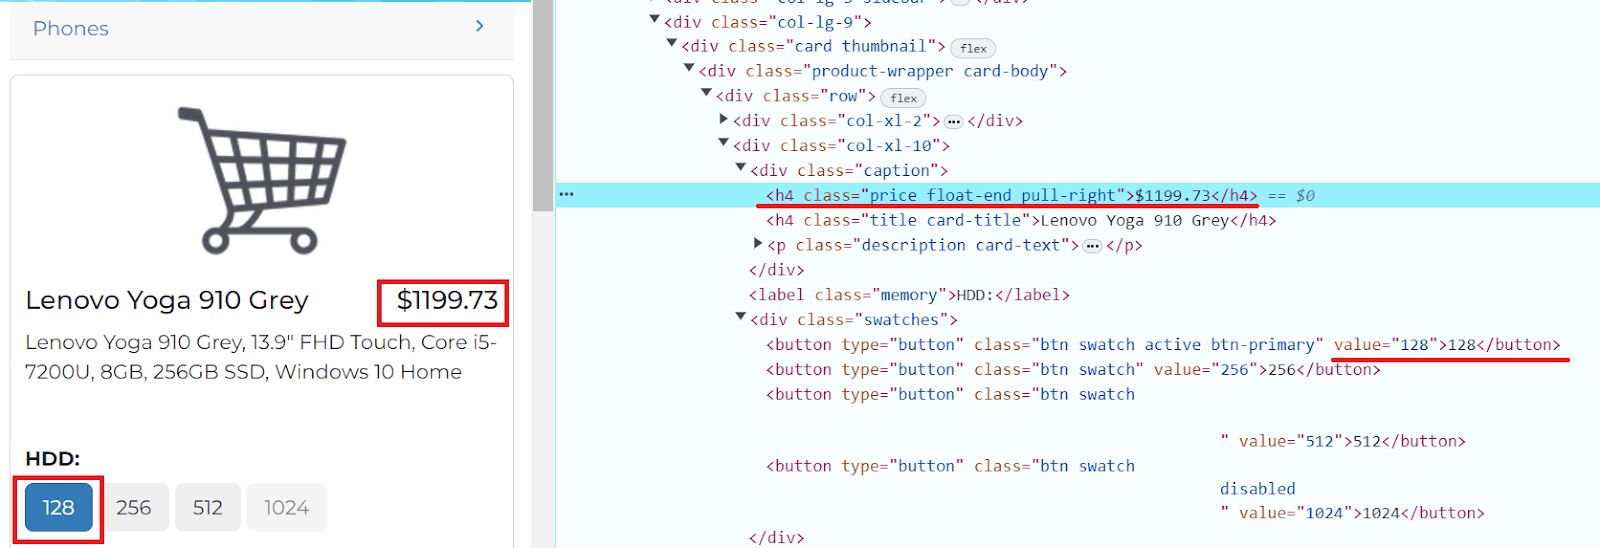
Let’s look at an example of a simple web scraping script. For this example, we will use the page https://webscraper.io/test-sites/e-commerce/allinone/product/123, where we will search for the price of the 128 GB HDD version in the product card.
If Python is not yet installed on your computer, go to the official Python website and download the appropriate version for your operating system (Windows, macOS, Linux). In the terminal of your preferred development environment, you can check the installed Python version using the following command:
python --versionNext, you need to install Selenium by running the following command:
pip install seleniumCreate a new file and import the required libraries:
import time
from selenium import webdriver
You also need to add the ‘By’ class to the project, as it will be required for defining element search strategies on a web page in Selenium:
from selenium.webdriver.common.by import By
Chrome Driver Parameters
ChromeDriver options (ChromeOptions) are used to configure the behavior and launch parameters of the Chrome browser during Selenium automation. Here are some of these options:
You can find the full list of parameters here.
In our example, incognito mode is enabled. Initialize the Chrome driver and navigate to the required product page:
chrome_options = webdriver.ChromeOptions()
chrome_options.add_argument('--incognito')
driver = webdriver.Chrome(options=chrome_options)
driver.get('https://webscraper.io/test-sites/e-commerce/allinone/product/123')
driver = webdriver.Chrome(options=chrome_options)
driver.get('https://webscraper.io/test-sites/e-commerce/allinone/product/123')
Finding HTML Elements on a Page
In Selenium, element searching on a web page is performed using various methods provided by the By class. These methods allow you to locate elements using different criteria such as element ID, class name, tag name, attribute name, link text, XPath, or CSS selector.
Example of searching by ID:
By class name:
By tag name:
By attribute name:
By link text:
By CSS selector:
By XPath:
If you need to find multiple elements, use the method find_elements instead of find_element.
In our example, we need to find the location of the “128” button element and the price information:
Simulation of user actions
In Selenium, interaction with a web page is performed using methods provided by the WebElement object. These methods allow you to interact with elements just like a user would: clicking, typing text, etc.
Here are some of these methods:
Returning to our example. Using XPath, we locate the required button, click it, and then find the price element:
button_128 = driver.find_element(By.XPATH, "//button[@value='128']")
button_128.click()

# Wait some time for the price to load
time.sleep(3)

price_element = driver.find_element(By.XPATH, "//h4[@class='price float-end pull-right']")
Now we just print the product price for the selected HDD capacity to the console:
price_text = price_element.text
print("Product price:", price_text)

driver.quit()
So, here is what the full code looks like:
import time
from selenium import webdriver
from selenium.webdriver.common.by import By

chrome_options = webdriver.ChromeOptions()
chrome_options.add_argument('--incognito')

driver = webdriver.Chrome(options=chrome_options)
driver.get('https://webscraper.io/test-sites/e-commerce/allinone/product/123')

button_128 = driver.find_element(By.XPATH, "//button[@value='128']")
button_128.click()

time.sleep(3)

price_element = driver.find_element(By.XPATH, "//h4[@class='price float-end pull-right']")
price_text = price_element.text

print("Product price:", price_text)

driver.quit()
Pop-ups and banners
Very often websites display various banners and pop-up windows that can interfere with script execution. In such cases, ChromeDriver settings can be configured to disable these elements. Here are some of these parameters:
On the website used in our example, a cookie banner appears when the page loads. It can also be removed using other methods, one of which is a script that blocks such notifications. First, let’s inspect this element using Developer Tools:
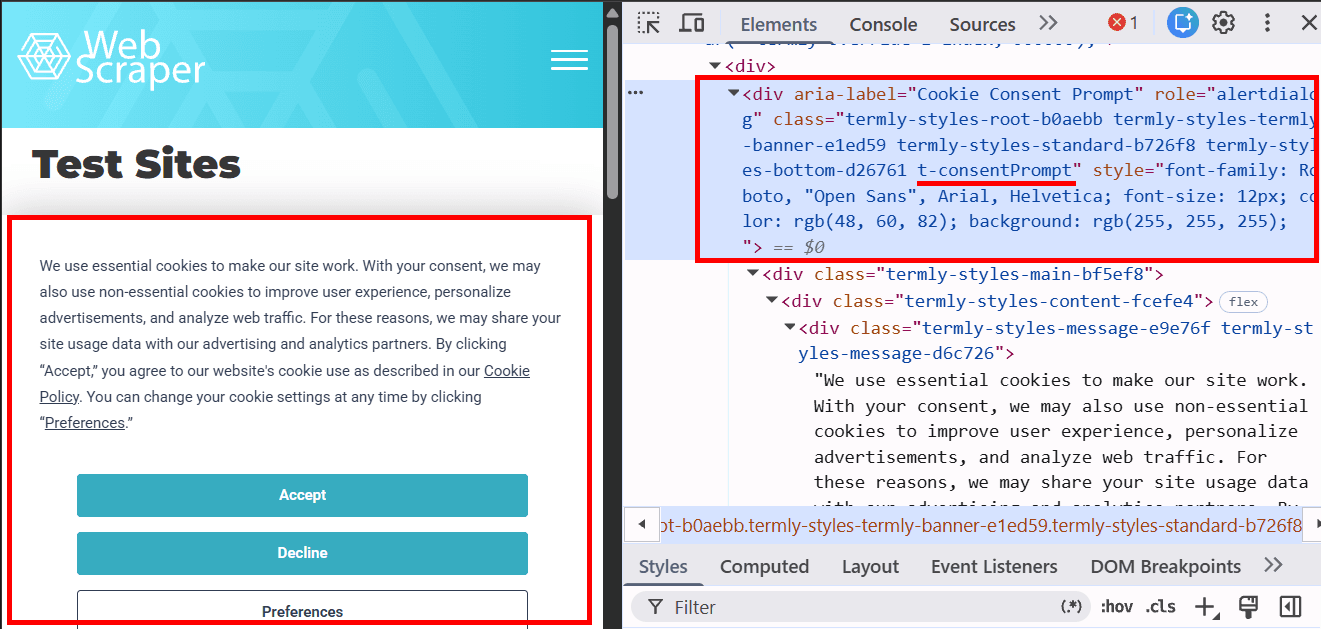
We use the class .t-consentPrompt to locate the cookie banner because it is the most stable and readable CSS selector for this element. Generated classes such as termly-styles-root-b0aebb may change after site updates, so they are usually not used for automation.
The banner is hidden using style.display = 'none' so it does not cover the page and does not interfere with Selenium interaction.
Now we can hide this banner by adding the corresponding logic to our script:
import time
from selenium import webdriver
from selenium.webdriver.common.by import By

chrome_options = webdriver.ChromeOptions()
chrome_options.add_argument('--incognito')

driver = webdriver.Chrome(options=chrome_options)
driver.get('https://webscraper.io/test-sites/e-commerce/allinone/product/123')

# Script to hide Termly cookie banner
script = """
var banner = document.querySelector('.t-consentPrompt');
if (banner) {
    banner.style.display = 'none';
}
"""

driver.execute_script(script)

button_128 = driver.find_element(By.XPATH, "//button[@value='128']")
button_128.click()

time.sleep(3)

price_element = driver.find_element(By.XPATH, "//h4[@class='price float-end pull-right']")
price_text = price_element.text

print("Product price:", price_text)

driver.quit()
Another way to close the banner is to simulate a user action by clicking the Accept or Decline buttons. Inspect the required element (for example, the Accept button):
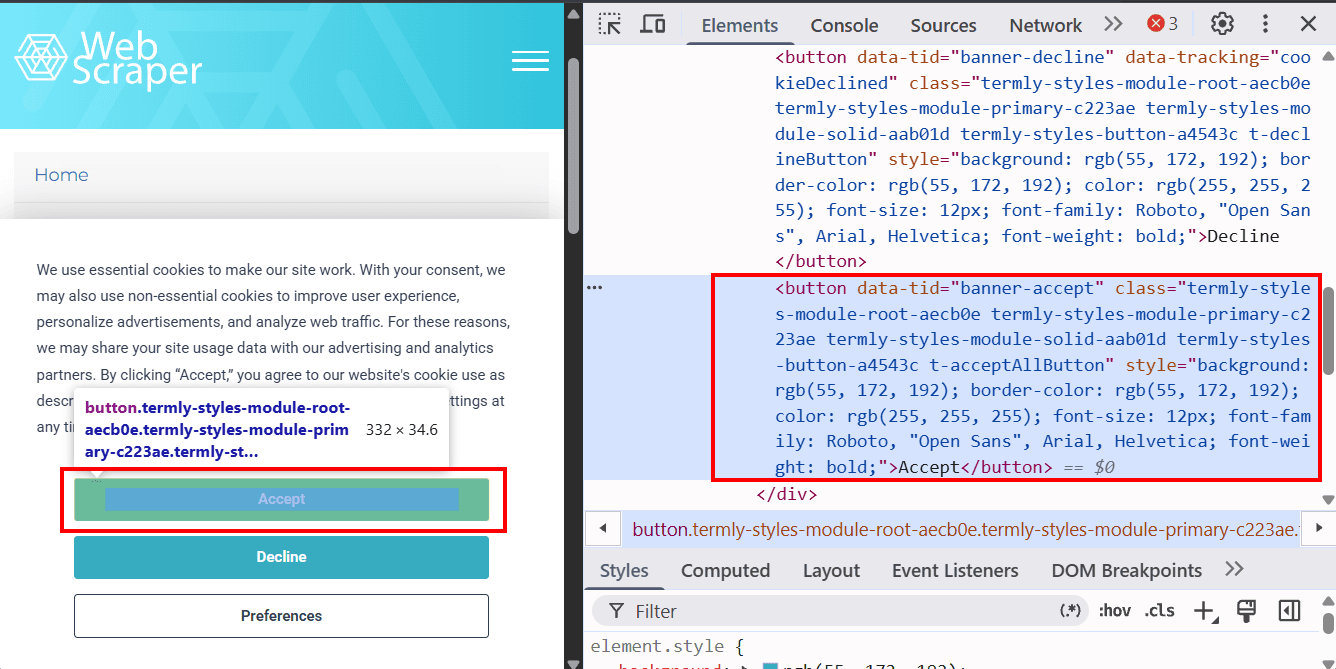
We can locate the button by data-tid="banner-accept" and click it using button.click():
import time
from selenium import webdriver
from selenium.webdriver.common.by import By
from selenium.webdriver.support.ui import WebDriverWait
from selenium.webdriver.support import expected_conditions as EC

chrome_options = webdriver.ChromeOptions()
chrome_options.add_argument('--incognito')

driver = webdriver.Chrome(options=chrome_options)

driver.get('https://webscraper.io/test-sites/e-commerce/allinone/product/123')

# Wait for Accept button and click it
accept_button = WebDriverWait(driver, 10).until(
    EC.element_to_be_clickable(
        (By.XPATH, "//button[@data-tid='banner-accept']")
    )
)

accept_button.click()

# Click 128 GB button
button_128 = driver.find_element(By.XPATH, "//button[@value='128']")
button_128.click()

time.sleep(3)

# Get price
price_element = driver.find_element(
    By.XPATH,
    "//h4[@class='price float-end pull-right']"
)

price_text = price_element.text

print("Product price:", price_text)

driver.quit()
Another effective approach is using Chrome extensions that automatically accept or block all cookie banners. These extensions can be installed in the browser and then added via ChromeOptions. Download a suitable extension in .crx format and use it in your script:
import time
from selenium import webdriver
from selenium.webdriver.common.by import By

# Path to .crx extension
extension_path = '/path/to/extension.crx'

chrome_options = webdriver.ChromeOptions()
chrome_options.add_argument('--incognito')

# Add extension
chrome_options.add_extension(extension_path)

driver = webdriver.Chrome(options=chrome_options)

driver.get('https://webscraper.io/test-sites/e-commerce/allinone/product/123')

button_128 = driver.find_element(By.XPATH, "//button[@value='128']")
button_128.click()

time.sleep(3)

price_element = driver.find_element(By.XPATH, "//h4[@class='price float-end pull-right']")
price_text = price_element.text

print("Product price:", price_text)

driver.quit()
This approach removes the need to manually interact with such elements when loading the page.
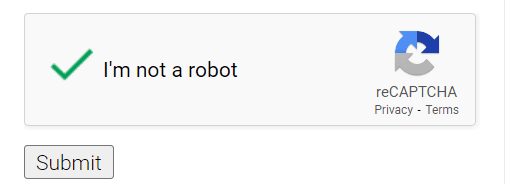
Captcha solving in web scraping
When extracting data, obstacles often appear in the form of CAPTCHAs designed to protect websites from bots. To bypass such restrictions, the most effective approach is to use specialized services that can recognize different types of CAPTCHAs. One of such tools is CapMonster Cloud, which is able to automatically solve even the most complex CAPTCHAs in a very short time. This service provides both browser extensions (for Chrome, for Firefox), as well as API methods (you can learn more in the documentation), which you can integrate into your code to obtain tokens, successfully bypass protection, and continue running your script.
Some types of CAPTCHAs that CapMonster Cloud easily handles:
All types of reCAPTCHA

GeeTest
Cloudflare Turnstile and Challenge
DataDome

Example code for automatic CAPTCHA solving and web scraping
This script uses the official CapMonster Cloud Python library and Selenium to solve a CAPTCHA on a page, then extracts the page title and prints it to the console:
import asyncio
from selenium import webdriver
from selenium.webdriver.remote.webdriver import WebDriver
from selenium.webdriver.common.by import By
from selenium.webdriver.chrome.options import Options
from capmonstercloudclient import CapMonsterClient, ClientOptions
from capmonstercloudclient.requests import RecaptchaV2Request

async def solve_captcha(api_key, page_url, site_key):
    client_options = ClientOptions(api_key=api_key)
    cap_monster_client = CapMonsterClient(options=client_options)
    recaptcha2request = RecaptchaV2Request(websiteUrl=page_url, websiteKey=site_key)
    responses = await cap_monster_client.solve_captcha(recaptcha2request)
    return responses['gRecaptchaResponse']

async def parse_site_title(driver: WebDriver, url: str) -> str:
    driver.get(url)

    driver.implicitly_wait(10)
    title_element = driver.find_element(By.TAG_NAME, 'title')
    title = title_element.get_attribute('textContent')

    return title

async def main():
    api_key = 'YOUR_API_KEY'  # Replace with your CapMonster Cloud API key
    page_url = 'https://lessons.zennolab.com/captchas/recaptcha/v2_simple.php?level=low'
    site_key = '6Lcf7CMUAAAAAKzapHq7Hu32FmtLHipEUWDFAQPY'
    options = Options()
    driver = webdriver.Chrome(options=options)

    captcha_response = await solve_captcha(api_key, page_url, site_key)
    print("CAPTCHA solution:", captcha_response)
    site_title = await parse_site_title(driver, page_url)
    print("Page title:", site_title)
    driver.quit()

if __name__ == "__main__":
    asyncio.run(main())
Conclusion
Using Python and Selenium for web scraping opens up many opportunities for automating data collection from websites, while integration with CapMonster Cloud helps easily bypass CAPTCHAs and significantly simplifies the data collection process. These tools not only speed up work but also ensure the accuracy and reliability of the collected data. With their help, you can gather data from a wide range of sources, from online stores to news websites, and use it for analysis, research, or your own projects. And all this does not require deep programming knowledge — modern technologies make web scraping accessible even for beginners. So, if you value simplicity, maximum convenience, and time savings when working with data, Python, Selenium, and CapMonster Cloud are an excellent combination to achieve this goal!
NB: Please note that this product is intended for automating testing exclusively on your own websites and resources to which you have legal access rights.


